
Table of Contents
One of Playgama’s goals is to create new web gaming–tailored ad formats for developers. And in the latest version of the Playgama Bridge SDK, we released a new kind of ad banner.
The main difference between Advanced Banners and other ad formats is that they can be placed anywhere on the game screen, at any particular moment (pause menu, win/lose screen, etc.), set to the desired size, and they don’t interrupt gameplay, unlike interstitials.
That’s why they work well for games with long sessions or where natural pauses for interstitial ads (which usually appear between levels or sessions) are rare.
Why We Created Another Kind of Ad Banner for Web Games
Banner ads are one of the most accessible monetization formats. Unlike interstitials or rewarded ads, they don’t require the player to make a decision — they appear in the background and generate revenue passively, without interrupting the game session.
Advanced banners go a step further: the platform handles sizing, rotation, and responsive layout automatically. You define where the ad zones are placed, and the platform fills them with the right ad for each device and screen size.
Puzzle and strategy games benefit the most from Advanced Banners — long sessions and static screens mean more impressions per user. A well-placed banner on a loss or pause screen can generate revenue comparable to an interstitial without the friction.
Using Advanced Banners: Test Different Approaches
The main feature of Advanced Banners is deep customization, because there is no single configuration that works best for every game. The right number of zones, ad positions, and which screens they appear on should all be guided by the game’s layout, session length, and audience.
A placement that works perfectly in a puzzle game with static screens may hurt retention in a fast-paced arcade game where any distraction costs the player a life. The only way to find the right balance is to test.
Start minimal: one zone, one placement, one screen. Measure the impact on retention and session length before adding more. It’s much easier to scale up a working configuration than to recover from a setup that drove players away.
Adding a second banner zone does not automatically double revenue — it can reduce session length if the ad load feels too heavy. Always validate with the data before implementing the change forever.
1. When to Show Banners
In some games, banners during active gameplay work well. This is typically the case for puzzle, strategy, and match-3 titles. For these genres, we recommend placing banners in side zones or at the top or bottom of the page.
For more dynamic genres like action or racing, where users are actively engaged in gameplay, we recommend testing banners with a minimum zone size of 320×100 and making sure they don’t overlap any game controls.
| Show on | Use with caution | Don’t show on |
| Pause menu | During active gameplay | Over interactive controls |
| Win / Lose screen | Over score, timer, or health HUD | |
| Level complete screen | Immediately at the session start | |
| Between levels | ||
| Main menu | ||
| Shop or upgrade screen |
2. Placement Options:
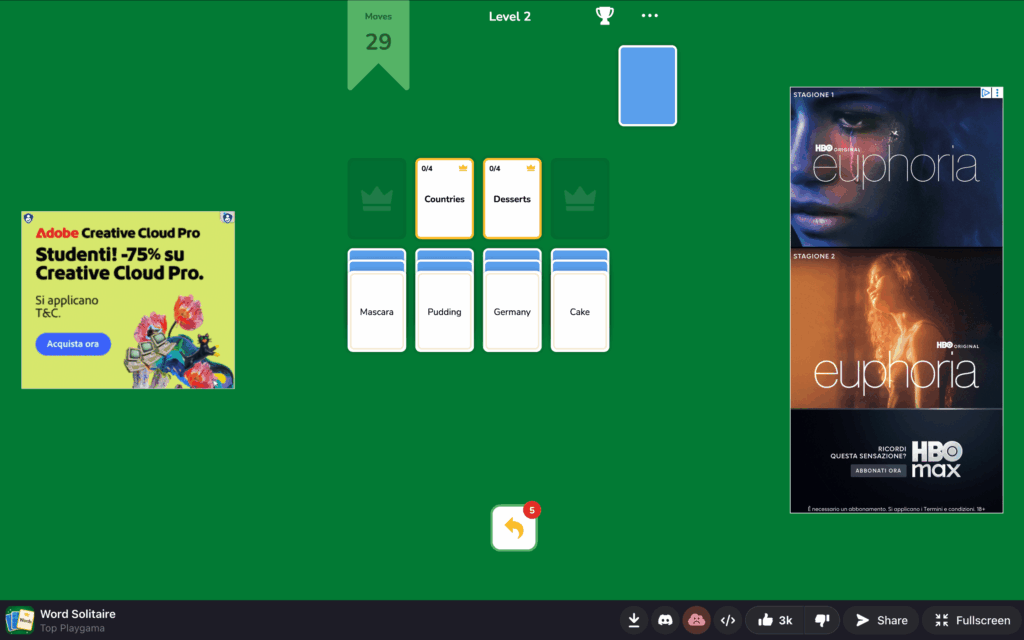
- Gameplay Screen
Where should you place advanced banners during a gameplay pause?
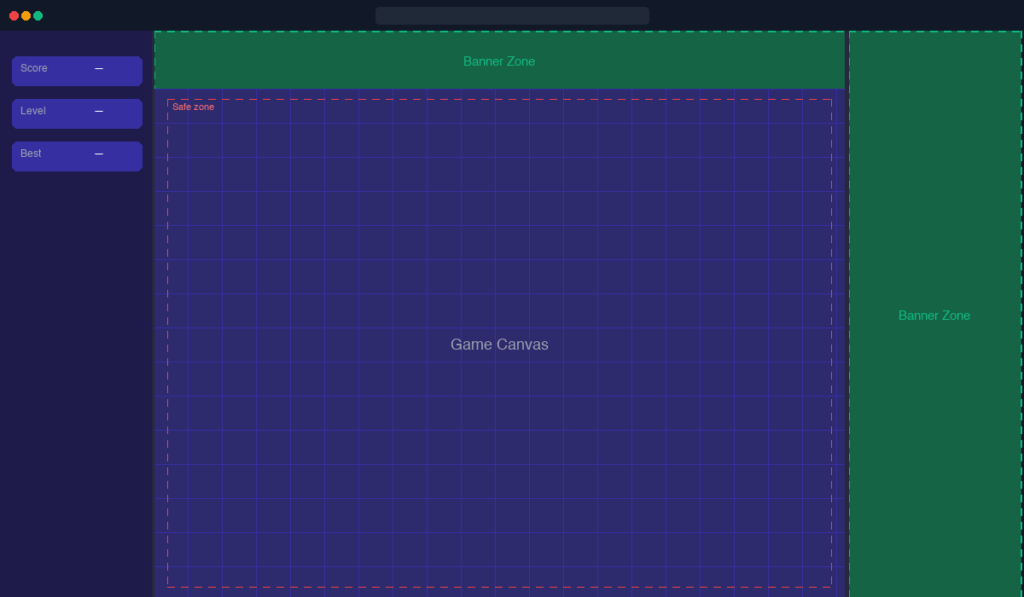
The sidebar and a top strip can work together on a static gameplay screen. The sidebar fills the space beside the game canvas; the top banner sits above it. Neither zone touches the interactive game area.
- Menu Screen
Where should you place advanced banners when a menu is opened?
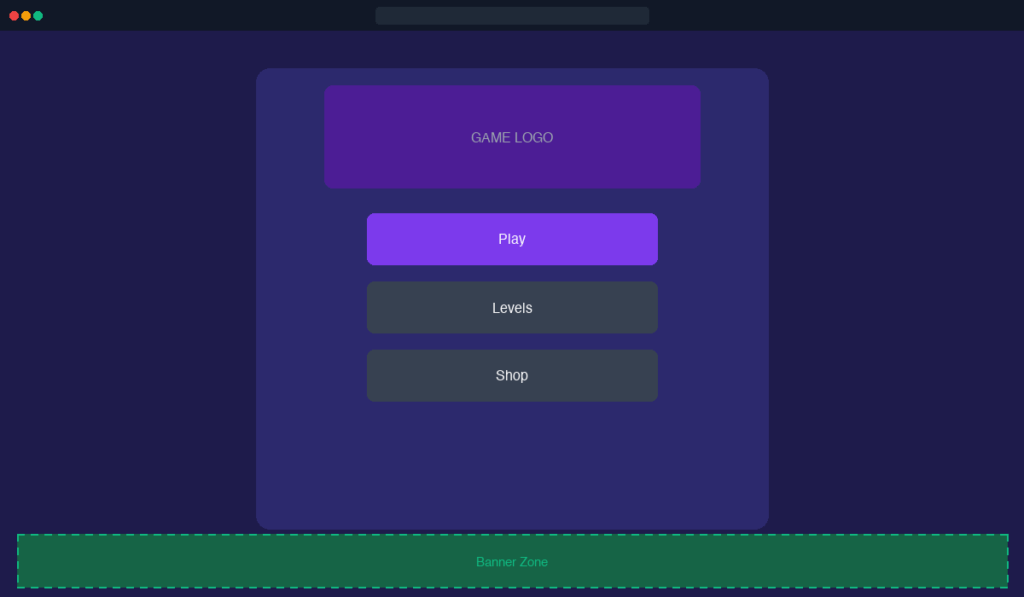
The main menu, shop, or level select screen is an ideal place for a banner. The player is not interacting with controls — any visible zone works.
3. Combining Zones.
For desktop games with a mobile aspect ratio (e.g., 9:16 or 3:4), we highly recommend utilizing the Side Panels. This turns “dead space” into a revenue stream without touching your game’s UI.
While it is technically possible to display multiple types of banners simultaneously — side “skyscrapers” and a bottom “leaderboard” — we recommend following the “One Screen, One Format” rule.
- Focus on UX: Overcrowding the screen with different banner types can distract the player and decrease the perceived quality of your game.
- Avoid Banner Blindness: Too many ads at once often lead to players ignoring them entirely or feeling overwhelmed.
- The Exception: If your game has a very clean “Main Menu” or “Settings” screen with ample padding, you might experiment with a combination. However, for active gameplay or transition screens, stick to a single, well-placed zone.
Start with a single banner per screen. Adding a second zone multiplies the ad load — test whether it affects player retention before keeping it permanently.
4. Zone Size.
Each zone must be large enough to render a banner — the minimum is 320×100 pixels. Zones smaller than that won’t fill and will waste ad requests.
5. Revenue Potential.
Banner revenue scales predictably with session volume and the number of banner requests per game. The table below shows estimated revenue for a game with 10,000 gameplays per day and 3 banner requests per game.
| Banner type | Revenue per 1 000 requests | Gameplays per day | Requests per game | Estimated Monthly Revenue |
| Big | $1.50 | 10000 | 3 | $1350 |
| Small | $1.00 | 10000 | 3 | $900 |
Estimates based on tier-1 traffic. Actual RPM varies by game genre.
What to Check After Launch
Launching banners is not the end of the process. Monitor these metrics in the first days after enabling a new placement:
- Average session length — a drop of more than 10–15% is a signal that the placement is too intrusive.
- Day 1 and Day 7 retention — banners that appear too early or too frequently are one of the most common causes of Day 1 churn.
- Ad impressions per session — if impressions are lower than expected, the zone may be too small to fill or placed on a screen players skip quickly.
- RPM over time — RPM typically stabilises after a few weeks as the ad network optimises. A sudden drop after stabilisation can indicate a viewability issue.
For full configuration reference and integration instructions, see the Advanced Banners technical documentation in the Playgama wiki.
